
FFMPEG
FFmpeg is a leading multimedia framework, able to decode, encode, transcode, mux, demux, stream, and filter anything created by humans and machines. It is a complete cross-platform solution to record, convert and stream audio and video.
This library abstracts the complex command-line usage of FFmpeg into a fluent, easy-to-use node.js module. To use this module, ensure you have FFmpeg installed on your system (including all necessary encoding libraries like libmp3lame or libx264).
How to use fluent-ffmpeg with node?
$ npm install fluent-ffmpeg
Now use the installed package in the file.
import ffmpeg from ‘fluent-ffmpeg’;
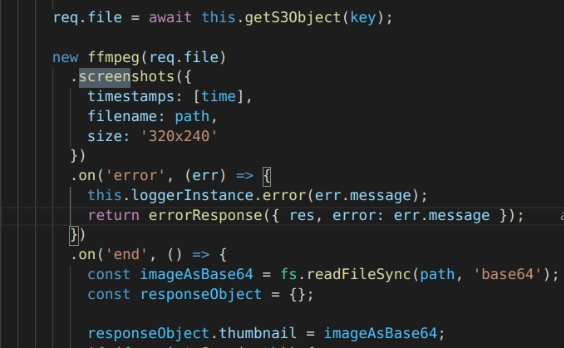
Creating a thumbnail from the desired video.
We will pass an input file name or readable stream, a configuration object, or both to the constructor to create a fluent-FFmpeg thumbnail, which has four functions that are -: thumbnail(), thumbnails(), screenshot(), and takeScreenshots().
Use the screenshot method to extract one or several thumbnails and save them as PNG files. There are a few caveats with this implementation, such as-
- It will not work on input streams.
- Progress information reported by the progress event will not be accurate.
- It doesn’t interact well with filters. Instead of using the size method to resize thumbnails, use the size option.
- We will use screenshot() to create a thumbnail passing three arguments:
The options argument is an object with the following keys:
Folder: output folder for generated image files. Defaults to the current folder.
Filename: output filename pattern. Defaults to “tn.png”.
Timemarks or Timestamps: It specifies an array of timestamps in the video where thumbnails should be taken. Each timestamp may be a number (in seconds), a percentage string (eg. “50%”) or a timestamp string with the format “hh:mm:ss.xxx” (where hours, minutes and milliseconds are both optional).
Size: Specifies a target size for thumbnails (with the same format as the .size() method). Note: you should not use the .size() method when generating thumbnails.
Steps:
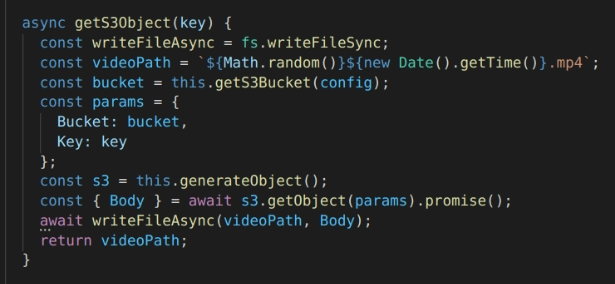
- First, we need to write the video in a synchronized way.
- And, then we are using the screenshot method to pass the time as a params which the user provides. It is the time frame in which the user wants to get the video’s thumbnail at a particular time.
- Timestamps param should not be greater than the size of the video.


If you enjoyed this post, I’d be very grateful. Thank you!