Akash Shukla
What is the custom post type in WordPress, and how to use it?
Last updated  December 15, 2021
The custom post-type is a specific post type that is an entirely free WordPress plugin, enabling you to create custom post types, taxonomies (e.g., categories, tags, etc.), custom fields, and custom templates directly from the WordPress dashboard. You don’t need any technical knowledge or programming languages to create a custom post-type. This plugin feature is ideal for web agencies, freelance developers, WordPress fans, and others to create different website content types.
How To Use It?
After logging in to the admin panel, you can view different content types like the post, page, attachment, revision, and nav menu on the left side of the admin panel. But if you need other post types apart from these default plugins, you have to create the custom post types, it looks the same as your post, and pages are showing in your admin panel. It is very beneficial to categorize your blog if you have a specific blog post for which you want a different kind of post type.
How to create custom post types: Now we know what the custom post types are, so let’s look at how to create them.
There are two ways to create custom post types: –
- With your active theme’s functions.php.
- By creating a custom plugin.
The coding method and procedure are the same for both methods.
To use the “With your active theme’s functions.php” method, you need to follow below points that are: –
- Hope you already know which theme is active in which you are working, and if not, go to Appearance->Themes, here you can easily see which is your active theme.
- Now go to your WordPress directory wp-content->Themes->Your Active Theme’s Folder.
- Here you can see the file functions.php, and this is the file where you have to put your code for the custom post types of creation.
In this file, you have to create the function for creating your custom post type, and in that function, you have to call the built-in function of WordPress “register_post_type”.
- You have to pass your post_type_name, labels, and arguments in this function.
- You have to put labels and arguments into the form of an array. Here is an example of the function of creating the custom post types:
Suppose we have to create a custom post type named: books
/**
* Register a custom post type called “book”.
*
* @see get_post_type_labels() for label keys.
*/
function new_book_init() {
$labels = array(
‘name’ => _x( ‘Books’, ‘Post type general name’, ‘textdomain’ ),
‘singular_name’ => _x( ‘Book’, ‘Post type singular name’, ‘textdomain’ ),
‘menu_name’ => _x( ‘Books’, ‘Admin Menu text’, ‘textdomain’ ),
‘name_admin_bar’ => _x( ‘Book’, ‘Add New on Toolbar’, ‘textdomain’ ),
‘add_new’ => __( ‘Add New’, ‘textdomain’ ),
‘add_new_item’ => __( ‘Add New Book’, ‘textdomain’ ),
‘new_item’ => __( ‘New Book’, ‘textdomain’ ),
‘edit_item’ => __( ‘Edit Book’, ‘textdomain’ ),
‘view_item’ => __( ‘View Book’, ‘textdomain’ ),
‘all_items’ => __( ‘All Books’, ‘textdomain’ ),
‘search_items’ => __( ‘Search Books’, ‘textdomain’ ),
‘parent_item_colon’ => __( ‘Parent Books:’, ‘textdomain’ ),
‘not_found’ => __( ‘No books found.’, ‘textdomain’ ),
‘not_found_in_trash’ => __( ‘No books found in Trash.’, ‘textdomain’ ),
‘featured_image’ => _x( ‘Book Cover Image’, ‘Overrides the “Featured Image” phrase for this post type. Added in 4.3’, ‘textdomain’ ),
‘set_featured_image’ => _x( ‘Set cover image’, ‘Overrides the “Set featured image” phrase for this post type. Added in 4.3’, ‘textdomain’ ),
‘remove_featured_image’ => _x( ‘Remove cover image’, ‘Overrides the “Remove featured image” phrase for this post type. Added in 4.3’, ‘textdomain’ ),
‘use_featured_image’ => _x( ‘Use as cover image’, ‘Overrides the “Use as featured image” phrase for this post type. Added in 4.3’, ‘textdomain’ ),
‘archives’ => _x( ‘Book archives’, ‘The post type archive label used in nav menus. Default “Post Archives”. Added in 4.4’, ‘textdomain’ ),
‘insert_into_item’ => _x( ‘Insert into book’, ‘Overrides the “Insert into post”/”Insert into page” phrase (used when inserting media into a post). Added in 4.4’, ‘textdomain’ ),
‘uploaded_to_this_item’ => _x( ‘Uploaded to this book’, ‘Overrides the “Uploaded to this post”/”Uploaded to this page” phrase (used when viewing media attached to a post). Added in 4.4’, ‘textdomain’ ),
‘filter_items_list’ => _x( ‘Filter books list’, ‘Screen reader text for the filter links heading on the post type listing screen. Default “Filter posts list”/”Filter pages list”. Added in 4.4’, ‘textdomain’ ),
‘items_list_navigation’ => _x( ‘Books list navigation’, ‘Screen reader text for the pagination heading on the post type listing screen. Default “Posts list navigation”/”Pages list navigation”. Added in 4.4’, ‘textdomain’ ),
‘items_list’ => _x( ‘Books list’, ‘Screen reader text for the items list heading on the post type listing screen. Default “Posts list”/”Pages list”. Added in 4.4’, ‘textdomain’ ),
);
$args = array(
‘labels’ => $labels,
‘public’ => true,
‘publicly_queryable’ => true,
‘show_ui’ => true,
‘show_in_menu’ => true,
‘query_var’ => true,
‘rewrite’ => array( ‘slug’ => ‘book’ ),
‘capability_type’ => ‘post’,
‘has_archive’ => true,
‘hierarchical’ => false,
‘menu_position’ => null,
‘supports’ => array( ‘title’, ‘editor’, ‘author’, ‘thumbnail’, ‘excerpt’, ‘comments’ ),
);
register_post_type( ‘book’, $args );
}
add_action( ‘init’, ‘new_book_init’ );
So, the above example we get from codex.wordpress.org, the word press’s official website.
Don’t be scared by seeing the much longer code; the above code shows just the maximum possibilities of the arguments we can use in our custom post type creation. We can see on the above code the main function register_post_type needs only:
- Custom post type name which we have to register.
- And arguments, which decide what things we need in our custom post admin panel, what should be things we are putting in our custom post, what should be their labels, we can do this by passing an array of labels and arguments.
Most of the arguments are understandable by its name, only you can see above. I don’t think it would need to be explained, but I will give you an overview of it so you can easily understand it. Labels – The first one is “labels.” It is an argument that can view on the admin panel. When we add, edit, or delete the post types, the labels can decide what should be text over there; there is no need to explain more. You can easily understand it by the above code given. Arguments other than labels which define under “$args” variable, are as follows:
- Public – If it’s true, it decides whether you want to show your posts to others or not.
- Supports – This parameter decides what are the things which you want to add to your admin panel when you edit the single custom post type, like, title – The “title” parameter displays the box for entering the title of your single post which you are adding or editing.
- editor- By this parameter, you can create the editor box for post content
- author- This parameter shows the author’s name with your post type.
- thumbnail- This parameter provides a featured image to your CPT.
- excerpt- This parameter adds a box to adding excerpts for your single post.
- comments- By using this parameter, you can allow others to comment on your posts.
After defining the labels and arguments, you have to call the register_post_type function to create your custom post type. You will need two parameters, first is the post type name in which you are registering. The name should be specific because whenever you use to call your custom post, you have to use this name in the query. Second is your arguments- you can wrap the arguments in some variable as you can see above, we use “$args” for this, or if you have passed minimum arguments then you can call directly like shown below:
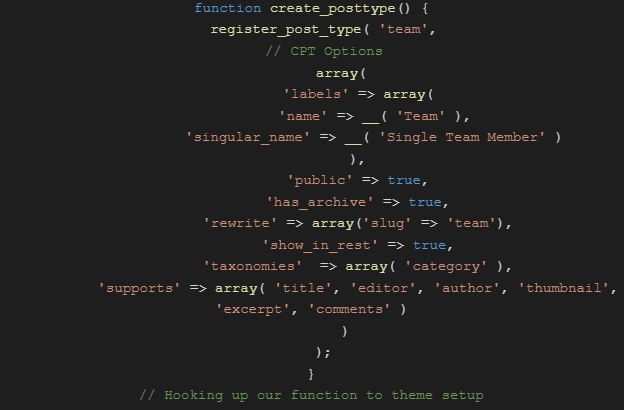
In the above code example, you can see how we can directly post arguments to the register_post_type function, unlike the previous code. After defining all the arguments, including labels, we have to close the array and function. Our custom post-type function code is ready now. If we arap our arguments in a variable like $args, we have to call this variable other than the arguments.
After calling the register-post-type function and passing the needed parameter, we close the function and call the action hook named add_action. It has minimal two parameters- first is an action which we are performing called hook name in our case. For this, we use “init,” which runs after the WordPress is loading bur before the headers are already sent. And the second one is our function name, which we are created for making the custom post type.
How to query or display your custom post type in WordPress page or post template
After creation, a question may arise in our mind: how can we display our newly created post type on the pages of the site. The answer to this question is you have to query your custom post type. You have to write the query for displaying your custom post type. There are multiple inbuilt functions are in WordPress for querying the post types, but the most popular two functions are in these days :
- get_posts
- query_post
- get_posts – In this method, you have to call the arguments in the array even. You can wrap the arguments into some variable and call it under the get_posts. In this function, the arguments are the information about which post type you want to query and how many posts of that post type can be shown at a time. If you wish to particular posts from some specific category, you have to mention that on the arguments. Here is the example of get_posts you can see:
$args = array(
‘numberposts’ => 20,
‘category’ => 4
);
$my_posts = get_posts( $args );
if( ! empty( $my_posts ) ){
$output = ‘<ul>’;
foreach ( $my_posts as $p ){
$output .= ‘<li><a href=”‘ . get_permalink( $p->ID ) . ‘”>’
. $p->post_title . ‘</a></li>’;
}
$output .= ‘<ul>’;
}
In the above example, you can quickly see how the get-posts work. We wrapped the arguments into the “$args” variable, and after that, we call the “for each” loop we can also use the while loop for this. In the get-posts or any other method for querying the custom post type, you can send multiple arguments for categorizing your posts which you want to get by the query. We’re mentioning some of the arguments that can help us categorize your posts, and you have to pass these arguments under the arguments.
- Numberposts – “numberposts” it also helps to create pagination for your custom post type. You can also use these arguments in the other format like this:
- “posts_per_page” => 5,
- Category- “category” this argument is used to get posts from the specific category. Suppose you categorize your posts and want the specific category posts only to be displayed. In that case, you have to pass the category id into this parameter, And if you want more than one category, then put it in the comma-separated format like this:
- “category” => 2,3,5,
- Post_type- This is one of the essential parameters which decides which kind of post type you want to display as we are currently talking about the custom post types, so we have to put that name by which we are registering our post types. As the above example, we are creating the custom post type named “book”, so if we want to query this post type, we have to mention that name in this parameter like this:
- “post_type” => “book”
order_by- This filter helps us organize our post to a specific format- if we want our post to order by date or any particular kind of alphabetical order, we use this parameter to organize our posts: “Order_by” => “date.”
- Include- It is used to retrieve the posts id’s you want to include. If you want more than one post, you have to put them into an array. Exclude- As the name suggests, it is opposite to exclude those post ids, which are the array of post ids you mentioned.
- Meta_key- Retrieving those posts with some specific meta_key, if you are adding some custom meta fields by ACF plugin or by custom meta box and you want only those posts with that particular field, only that time we will use this parameter. In this parameter, we just only have to pass the meta_key value.
- Meta_value- If we want to retrieve posts with some specific meta_key and some specific value of that particular meta_key, we will use this parameter.
- Offset- If we want to display all posts of our defined query but leave some of them from the starting posts, we are using this parameter
So, these above are some of the parameters or filters you can retrieve only specific posts you want to display. We think you can get precisely those posts you want to display by these parameters.
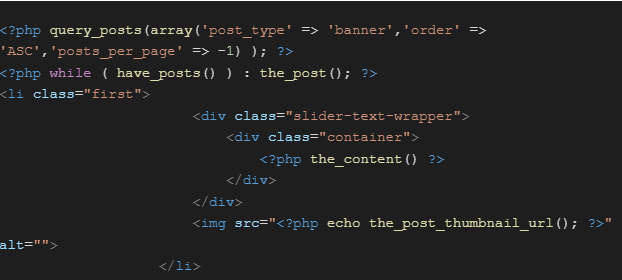
Query posts- This is another method for querying the post types; the recent latest version of WordPress introduces it. In this method, the parameters are the same as I described above, but the process of calling the parameters is different; you can see it by the below example
So, you can easily see in the above example that we use the parameters in the query-post function, and after that, we are using the loop. There are multiple ways available in WordPress to query the custom post type. We have explained two of the above here. So, we can now understand how we can create the custom post types and display them by query and design them accordingly, as you can see in the above example.
But here is a question that arises how can we call the different elements or parts of the post in our query like title, thumbnail, content, excerpt, so? We use some functions that we have to call in the query loop of custom post type, and we can use HTML tags and other styling methods accordingly.
- the_title() – This is the built-in function of wordpress , it is used for calling the post title in the loop.
- the_content()- This function is used for displaying the content of the post.
- the_post_thumbnail()- This function is used for calling thumbnail images from custom posts.
- get_the_post_thumbnail_url()- This function is used for getting the thumbnail url. We can also use the_post_thumbnail_url() for calling the url of post thumbnail.
- the_excerpt()- This function is used for calling the excerpt of the post.
- get_the_author() & get_the_author_meta() – This function is used for displaying the post’s author details in the query. Second function for author meta details.
The Loop- The loop is used to display the custom post type; whatever custom-post type element we call, we have to call under the while loop.
If you want to display your posts in some structured format in a particular template, write the query in that specific post or page template. So, finally, we understand how to create custom post types and how to query them for displaying in our WordPress posts and pages.