Shubham Joshi
Deploy Keycloak with Docker on Amazon EC2.
Last updated  August 9, 2021
Hey geeks, I’m writing this blog because while deploying the Keycloak instance on Amazon EC2, I read a bunch of documentation, blogs, and posts. I found it frustrating because none of them were having straight forward solutions. Some of them are even incomplete and confusing.
If you are here I assume that you must be having some basic knowledge of keycloak, but if you don’t know then here it is.
What the heck is Keycloak?
Keycloak is an open-source Identity and Access Management solution aimed at modern applications and services, just like Auth0 and Okta.
In this blog, I will cover-up the following points.
- Launch EC2 Instance and configure it for DNS.
- Setup Keycloak instance using docker.
- Setup Nginx reverse proxy.
- Configure SSL for it.
So is it a production grade ?
Biiig NO ?, it is a bare metal configuration, don’t use it in production.
For production I would suggest you to check this.
Let’s dive into practical ?
1. EC2 & DNS
Launch an ec2 instance from your AWS console. I’m using Ubuntu 16.04 LTS
image.
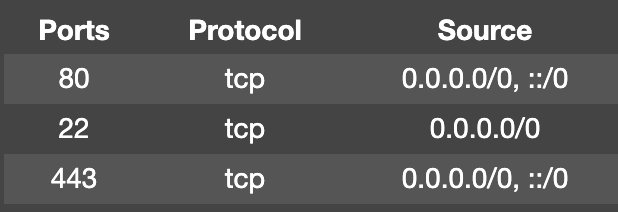
Configure your security group, Inbound rules should be like this.
SSH your instance using the below command.
$ ssh -i <your-key.pem> <instance-public-domain>
Check your instance image using:
$ lsb_release -a
You will get something like this, it is just the basic info of your Linux distribution.

Copy your instance public IP and create an ‘A Type’ record in your DNS records.
Note: This may take a while to populate that’s why we are doing this step early.
Congratulations we just completed our 1st step…

2. Setup Keycloak
Let’s start with updating packages, to do that use the below command.
$ sudo apt-get update
We need docker to install it, use the below command.
$ sudo apt install docker.io
The next command will pull the keycloak image and start a docker container.
$ docker run -d -e KEYCLOAK_USER=temp -e KEYCLOAK_PASSWORD=temp -e PROXY_ADDRESS_FORWARDING=true -p 9090:8080 jboss/keycloak
Note: set appropriate username and password in above command.
docker run command :- first creates a writeable container layer over the given image.
-d flag:- It runs the container in detached mode.
-e flag:- It sets the environment variables.
-p flag:- It publish a container’s port(s) to the host.
jboss/keycloak is keycloak’s image resides in dockerhub’s public repository.
Where’s DB ? yes we can configure it but I’m configuring bare metal server, for more info and configs check here.
You can visit the below link and you will see that keycloak is running ?✌?.
Note: If you click on admin console it will throw error “require https”.
http://<instance-public-domain>:9090
But wait, what… are we going to use our server like this with that ugly port and HTTP? ?
3. Setup Nginx reverse proxy.
Well, to remove that port and use our domain name, first we have to install Nginx, which is pretty obvious!! ?
$ sudo apt install nginx
Now we have to configure a firewall.
$ sudo ufw enable
$ sudo ufw status
$ sudo ufw allow ssh           // Port 22
$ sudo ufw allow http          // Port 80
$ sudo ufw allow https         // Port 443
$ sudo ufw allow 'Nginx Full'
$ sudo ufw delete allow 'Nginx HTTP'
Let’s configure Nginx
$ sudo nano /etc/nginx/sites-available/default
Note: Best practice is to create backup of the default file before configuring it.
Copy below config file and paste in nano editor and configure.
here is nginx-config gist for better understanding
What needs to configure in the default file?
check line no 19 && 39.

Replace your domain name, atleast one is required.

server_name <your_domain.com> <www.your_domain.com>;

$ sudo nginx -t // It will compile nginx config file

$ sudo systemctl restart nginx // To restart nginx with new config.
We just configured our Nginx reverse proxy to the keycloak server ?. What about “https”?

4. SSL Configuration
$ sudo add-apt-repository ppa:certbot/certbot
$ sudo apt-get update
$ sudo apt-get install python-certbot-nginx
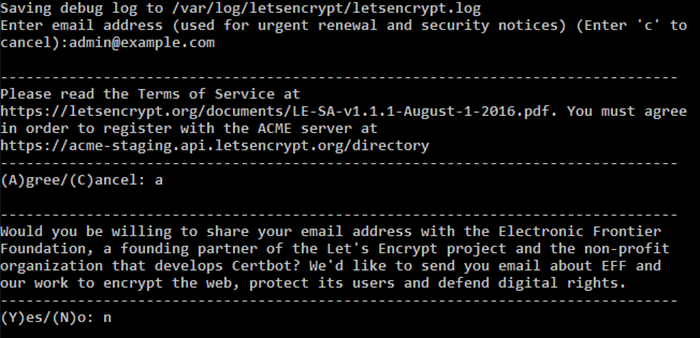
$ sudo certbot --nginx -d <yourdomain.com> -d <www.yourdomain.com>
The above command will initiate a CLI wizard as you see below, choose appropriate options that are suitable for you.
Note: SSL certificate is valid for 90 days only, to renew use below command.
$ certbot renew --dry-run
Hit, https://<your_domain.com> and Boom.. you did it..? ?.

Thanks for the support !!
And for reading my post.
If you like it please hit the clap button and share.
There is always room to improve, let me know your thoughts in the comments section.